Tag: GA4 for beginners

  • Setting Up GA4 (Google Analytics 4) Property: 7 Easy Steps for Beginners (2026 Guide)

    Setting Up GA4 (Google Analytics 4) Property: 7 Easy Steps for Beginners (2026 Guide)

    In today’s digital world, understanding your website data is not optional—it’s essential. Whether you are a business owner, blogger, or digital marketer, tracking your website performance helps you make better decisions and grow faster. This is where Google Analytics comes in.

    With the shift from Universal Analytics to Google Analytics 4 (GA4), many beginners feel confused. The interface looks different, and the setup process seems technical. But don’t worry—this guide will help you understand setting up GA4 property in a very simple and practical way.

    If you are learning Digital Marketing in Indore, or working with experts like kamlesh singad or code with kamlesh agency indore, this guide will give you a strong foundation.

    Let’s get started step by step.

    What is Google Analytics 4 (GA4)?

    Google Analytics 4 (GA4) is the latest version of Google Analytics. It helps you track and analyze how users interact with your website or app.

    Unlike the old version, GA4 is based on an event-based tracking system, which means:

    • Every action (click, scroll, page view) is tracked as an event
    • You get deeper insights into user behavior
    • It works better across devices (mobile and desktop)
    Google Analytics 4 (GA4)

    Why GA4 is Important in 2026

    • Universal Analytics is no longer active
    • GA4 provides advanced tracking features
    • Better privacy and data control
    • Helps improve marketing strategies

    For anyone doing Digital Marketing in Indore, learning GA4 is now a must-have skill.

    Why You Should Set Up GA4 Property

    Before jumping into steps, let’s understand why setting up GA4 property is important.

    Key Benefits:

    • Track website visitors in real-time
    • Understand user behavior
    • Measure conversions and goals
    • Improve marketing campaigns
    • Make data-driven decisions

    Whether you run a small business or work in an agency like code with kamlesh agency indore, GA4 helps you grow smarter.

    Read also : Online Reputation Management for Small Businesses: Complete Guide by Code With Kamlesh

    7 Easy Steps for Setting Up GA4 Property

    Now let’s go step by step. Follow these carefully and your GA4 will be ready.

    Step 1: Go to Google Analytics Website

    • Open your browser
    • Search for Google Analytics
    • Click on the official website
    • Sign in using your Gmail account

    If you already have an account, just log in. If not, create a new one.

    Step 2: Create a New Account

    Once you log in:

    • Click on Admin (bottom left corner)
    • Under the Account column, click Create Account
    • Enter your account name (for example: your business name)

    Settings to Select:

    • Data sharing settings (keep default or customize)
    • Click Next

    Step 3: Create GA4 Property

    Now comes the most important step—setting up GA4 property.

    • Enter Property Name (example: Your Website Name)
    • Select your Time Zone (India)
    • Select Currency (INR)
    • Click Next

    Business Details:

    • Choose your industry (Marketing, Education, etc.)
    • Select business size
    • Choose how you will use GA4

    Click Create

    Step 4: Set Up Data Stream

    After creating the property, you need to connect your website.

    • Select Web (for website tracking)
    • Enter your Website URL
    • Enter Stream Name (example: Main Website)

    Click Create Stream

    Step 5: Get GA4 Tracking Code

    Once your stream is created:

    • You will see a Measurement ID (G-XXXXXXX)
    • Scroll down and click View Tag Instructions

    Now you have two options:

    1. Install manually
    2. Use Google Tag Manager (recommended)

    Step 6: Install GA4 on Your Website

    Option 1: Manual Installation

    • Copy the tracking code
    • Paste it inside the <head> section of your website

    Option 2: Using Google Tag Manager

    • Open Google Tag Manager
    • Create a new tag
    • Choose GA4 Configuration
    • Paste Measurement ID
    • Publish the container

    Most professionals in Digital Marketing in Indore prefer Tag Manager because it’s easy and flexible.

    Step 7: Verify Your Setup

    After installing the code:

    • Go to GA4 dashboard
    • Click on Reports → Realtime
    • Visit your website in another tab

    If everything is correct, you will see active users (maybe just you)

    Congratulations. You have successfully completed setting up GA4 property.

    Google Analytics 4 (GA4)

    Common Mistakes to Avoid

    Many beginners make small mistakes during setup. Avoid these:

    • Not installing tracking code properly
    • Using wrong website URL
    • Forgetting to publish Tag Manager
    • Not checking real-time data
    • Ignoring event tracking

    Even experienced marketers like kamlesh singad recommend double-checking every step.

    Understanding GA4 Dashboard (Basic Overview)

    Once your GA4 is ready, you should understand the dashboard.

    Important Sections:

    1. Realtime Report

    Shows live users on your website

    2. Acquisition

    Shows where your traffic is coming from

    3. Engagement

    Shows user activity and time spent

    4. Monetization

    Tracks revenue (if applicable)

    5. Retention

    Shows returning users

    This data is very useful for improving your marketing strategies.

    Google Analytics 4 (GA4)

    Read also : 5 Powerful SEO Techniques to Grow Organic Traffic Fast | Code With Kamlesh

    How GA4 Helps in Digital Marketing

    If you are learning or doing Digital Marketing in Indore, GA4 plays a major role.

    Benefits for Marketers:

    • Track campaign performance
    • Understand customer journey
    • Optimize ads and SEO
    • Improve website experience
    • Increase conversions

    Agencies like code with kamlesh agency indore use GA4 daily to deliver better results for clients.

    Advanced Tips for Beginners

    Once your setup is done, try these:

    1. Set Up Events

    Track actions like:

    • Button clicks
    • Form submissions
    • Scroll depth

    2. Enable Conversions

    Mark important events as conversions

    3. Link Google Ads

    Connect GA4 with Google Ads for better tracking

    4. Use Custom Reports

    Create reports based on your needs

    Why Businesses in Indore Need GA4

    Indore is growing fast in the digital space. Businesses are moving online, and competition is increasing.

    Without data, you are guessing. With GA4, you are making smart decisions.

    That’s why professionals like kamlesh singad focus on tools like Google Analytics to help businesses grow.

    Real-Life Example

    Imagine you run a local business in Indore.

    Without GA4:

    • You don’t know who visits your site
    • You don’t know which page works
    • You don’t know where traffic comes from

    With GA4:

    • You see user behavior
    • You track conversions
    • You improve performance

    This is the power of setting up GA4 property.

    Read also : Advanced Digital Marketing Course in Indore | Learn with Code With Kamlesh Agency

    Who Should Learn GA4?

    This guide is useful for:

    • Beginners in digital marketing
    • Business owners
    • Bloggers
    • Students
    • Freelancers

    If you are part of Digital Marketing in Indore, GA4 is a must-learn skill in 2026.

    Final Thoughts

    Setting up GA4 may look complicated at first, but once you follow the steps, it becomes easy.

    You Learned:

    • What is Google Analytics 4
    • Why it is important
    • 7 easy steps for setup
    • Common mistakes
    • How it helps in marketing

    If you want to grow online, start with setting up GA4 property today.

    And if you need expert guidance, learning from professionals like kamlesh singad or agencies like code with kamlesh agency indore can help you move faster.

    FAQs

    1. What is GA4 property in Google Analytics?

    A GA4 property is a setup in Google Analytics 4 where your website or app data is collected and analyzed. It helps track user activity, traffic sources, and conversions in one place.

    2. How do I start setting up GA4 property?

    To start setting up GA4 property, you need to create a Google Analytics account, add a new property, set up a data stream, and install the tracking code on your website.

    3. Is Google Analytics 4 free to use?

    Yes, Google Analytics 4 is completely free and can be used by beginners, businesses, and marketers to track and analyze website performance.

    4. Do I need coding knowledge for setting up GA4 property?

    No, you do not need coding skills. You can set up GA4 using simple steps or tools like Google Tag Manager without writing code.

    5. How can GA4 help in digital marketing?

    GA4 helps in digital marketing by tracking user behavior, measuring campaign performance, identifying traffic sources, and improving conversions through data-driven insights.
  • How to Add Tracking Codes and Analytics to Your Website (part-10)

    How to Add Tracking Codes and Analytics to Your Website (part-10)

    Module 1: Website Planning & Development

    In digital marketing, what gets measured gets improved. Understanding how to add tracking codes and analytics to your website is essential if you want to make informed decisions, optimize campaigns, and boost conversions. Without it, you’re flying blind.

    According to Kamlesh Singad, founder of CWK Agency, “Analytics don’t just show you what’s happening—they show you what to do next.” Let’s explore how to properly set up tracking on your site, even if you’re not a tech wizard.

    What Are Tracking Codes and Analytics Tools?

    Tracking codes are small snippets of JavaScript or HTML code inserted into your website. They send data back to platforms like Google Analytics, Facebook Ads, or LinkedIn.

    Analytics tools help you understand:

    • Who visits your site
    • What they do on your site
    • How they got there
    • What content converts best

    Why Adding Tracking Codes Should Be Part of Website Planning & Development

    Many businesses launch websites without adding tracking—only to realize later they’ve lost months of valuable data.

    Kamlesh Singad highlights, “Integrate analytics during your website planning & development phase. It saves time and sets your digital strategy on a strong foundation.”

    Also Read: How to Make Your Podcast More Popular: 12 Proven Strategies for Growth

    How to Add Tracking Codes and Analytics to Your Website

    Essential Tools You Need to Track Website Performance

    Before diving into the how, here’s what you’ll likely need:

    • Google Analytics 4 (GA4) – Tracks traffic, user behavior, conversions
    • Google Tag Manager (GTM) – Manages all your tracking codes in one place
    • Google Search Console – Monitors organic traffic and SEO health
    • Facebook Pixel – Tracks Facebook and Instagram ad performance
    • LinkedIn Insight Tag – Tracks LinkedIn ad performance
    • Hotjar / Microsoft Clarity – Visual behavior tracking (heatmaps, recordings)

    Step-by-Step: How to Add Tracking Codes and Analytics to Your Website

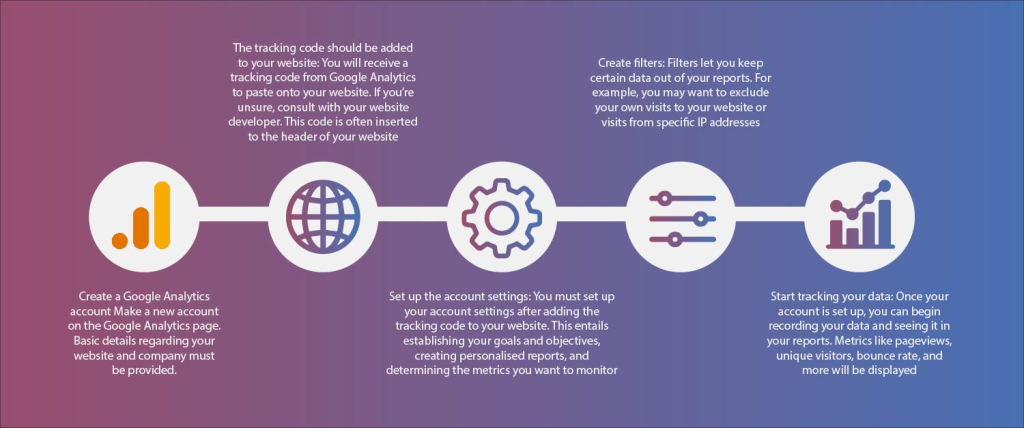
    Step 1: Create Your Analytics Accounts

    If you haven’t already:

    1. Go to analytics.google.com and create a GA4 property.
    2. Set up Google Tag Manager at tagmanager.google.com.
    3. Create ad tracking tools like Facebook Pixel or LinkedIn Insight Tag based on your ad platforms.

    Step 2: Install Google Tag Manager on Your Website

    Google Tag Manager (GTM) allows you to add and manage all tracking codes from one place—without editing the codebase every time.

    How to Install GTM:

    • Copy the GTM code snippets from your GTM dashboard.
    • Paste them into your site’s header and body (usually done via your theme or builder).
      • For WordPress: Use a plugin like “Insert Headers and Footers.”
      • For Wix/Squarespace: Use the custom code injection option.

    Kamlesh Singad says, “One dashboard, endless control—that’s the power of GTM.”

    Also Read: How Often Should Content Be Updated?

    How to Add Tracking Codes and Analytics to Your Website

    Step 3: Add Google Analytics 4 Using GTM

    Inside your GTM container:

    1. Create a new tag > Tag Configuration > GA4 Configuration
    2. Enter your GA4 Measurement ID (found in your Google Analytics setup)
    3. Choose “All Pages” as the trigger
    4. Save and publish

    Done! Now GA4 starts collecting traffic and engagement data.

    Step 4: Add Facebook Pixel with GTM

    For retargeting and ad performance:

    1. Go to your Facebook Events Manager and create a Pixel
    2. Copy the Pixel ID
    3. In GTM, create a new tag > Facebook Pixel Base Code
    4. Paste the Pixel ID, and trigger it on “All Pages”

    CWK Agency ensures every ad-driven website includes retargeting pixels for maximizing ad spend ROI.

    Step 5: Add Additional Tracking Tags

    Depending on your strategy, add:

    • LinkedIn Insight Tag
    • TikTok Pixel
    • Twitter Conversion Tag
    • Hotjar Code for heatmaps

    In GTM, just create a “Custom HTML” tag and paste the script, then trigger it accordingly.

    Also Read: How to Spend on Marketing the Right Way? A Strategic Guide for Maximum ROI

    How to Add Tracking Codes and Analytics to Your Website

    Step 6: Test Your Tags

    Use These Tools:

    • Google Tag Assistant (Chrome extension)
    • Facebook Pixel Helper
    • GA4 Debug View

    Testing ensures your tags are firing correctly before your marketing campaigns go live.

    Step 7: Set Up Conversion Events

    Conversion tracking helps measure results like:

    • Form submissions
    • Purchases
    • Clicks on key buttons

    In GA4:

    • Go to Admin > Events > Create Event
    • Set up conditions (e.g., when a user reaches a “Thank You” page)

    In Facebook:

    • Use the Event Setup Tool to track button clicks or page views as conversions.

    CWK Agency creates goal-specific events to link marketing efforts directly to ROI.

    Step 8: Monitor and Optimize

    Once tracking is live, check:

    • Traffic sources (where users come from)
    • Bounce rate and engagement
    • Top-converting pages
    • Funnel drop-offs

    Kamlesh Singad uses weekly reporting dashboards to guide campaign decisions and content planning.

    Common Mistakes to Avoid When Adding Tracking Codes

    • Adding multiple analytics scripts directly on the site (causes conflicts)
    • Forgetting to publish in GTM after changes
    • Not setting up proper conversion goals
    • Tracking too many random metrics without clear objectives
    • Ignoring privacy laws (always add a cookie consent banner)

    FAQs

    Can I use Google Analytics without Google Tag Manager?
    Yes, but GTM makes managing multiple scripts easier and cleaner.

    Do I need coding knowledge to add tracking codes?
    No, not if you’re using GTM or platforms like WordPress with plugins.

    How long does it take to see data in GA4?
    You’ll typically see data in real-time within minutes of installation.

    Are there any privacy or legal issues with tracking?
    Yes—always inform users via privacy policies and use cookie consent banners.

    Which analytics tools does CWK Agency recommend most?
    GA4 for behavior, GTM for management, Hotjar for user visuals, and Search Console for SEO.

    Conclusion: Make Every Click Count

    Knowing how to add tracking codes and analytics to your website gives you the data advantage in digital marketing. From understanding your users to optimizing your conversions, tracking is the silent engine driving your growth.

    With expert advice from Kamlesh Singad and implementation best practices from CWK Agency, your website is not just a digital brochure—it’s a measurable, dynamic marketing machine.

    Add your codes. Track what matters. And start making smarter decisions today.